
When Willow’s first birthday came around, I was absolutely obsessed with throwing a fabulous homemade party! And it was fabulous indeed. But the special aspects came from the handcrafted elements I put into it and the additional strong family attendance. So if ever in doubt, always opt for a family party – they truly are the most memorable. This invitation could be used for many events not just a number one. I made a felt number one for the inside but this could even be used for a baby shower invite, thank you card, or any age birthday card.
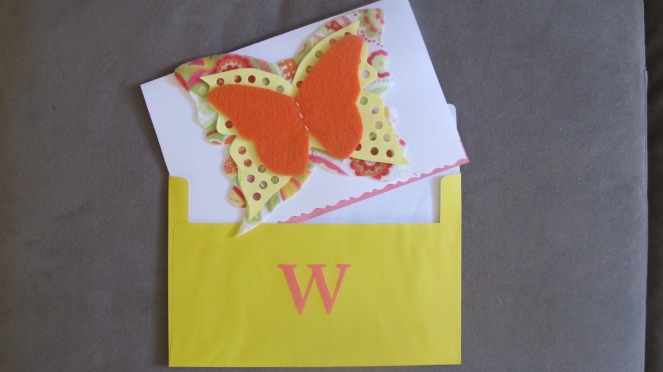
I love to monogram everything so I stamped the back side of the envelope with a big pink W. I definitely recommend doing this, it seemed to seal the deal!
Material List:
White matte card stock 8X10
Dandelion stamp and two stamp colors
One letter stamp with appropriate monogram
Paisley felt
Natural beige felt for the little birdie – trace a bird for shape
Orange felt
A scallop edged scissor in metal preferably – otherwise very difficult to cut it out!
Yellow regular computer paper
Individual hole puncher
Invite stamp with who, what, when, where info. on it, so you can fill in the info. yourself!
One nice pen to fill out the stamped info. information and to address your cards
Large colorful envelopes to fit your folded in half 8×10 paper
Needle and thread of a light pink
Needle needs to be sharp enough but a semi-thick needle to penetrate card stock and to have thick thread for a craftier look!
Pink and gold acrylic paint and small brush
One birthday candle to make gold dot pattern on bottom border
Painters tape to make the painted border – make sure it’s completely dry before pulling


So let’s get started. Willow is quickly approaching age 4 (this year we will do a Mickey/Minnie party!) and I still hear that my friends and family have this invitation hanging around after all this time. It’s either still on a fridge somewhere or in a file of keepsakes, so this let’s you know how impressionable a homemade card can truly be! I’m concerned I didn’t keep one for my baby book because I was continuously adding to my guest list, in which case, I will be asking for one back from a friend. I know that sounds nuts, but I really put a lot of work into it.
One more thing to note before you invest in these materials is make sure you use the materials on other items for your party to make it worth investing in acrylic paints and stamps and things…they can be costly. I used the invitation stamp with Who, Where, What, and Why for the number 2 mermaid party. I used the stamps for favors and paint probably for other dollhouse projects. Just try to think big picture when buying materials.
How to:
Step 1: Find a picture of a butterfly online and draw out a rough sketch of it in 3″ x 3″ about. Make a template that you like in the white card stock so you can cut-out shapes and not loose your pattern. Make sure it is perfect because that is your final pattern.
Step 2: Cut-out a few sheets of yellow computer paper at a time. Don’t pin it to cut it. Just trace it and cut it. Not so thick that the edges are rough. Make clean cuts.
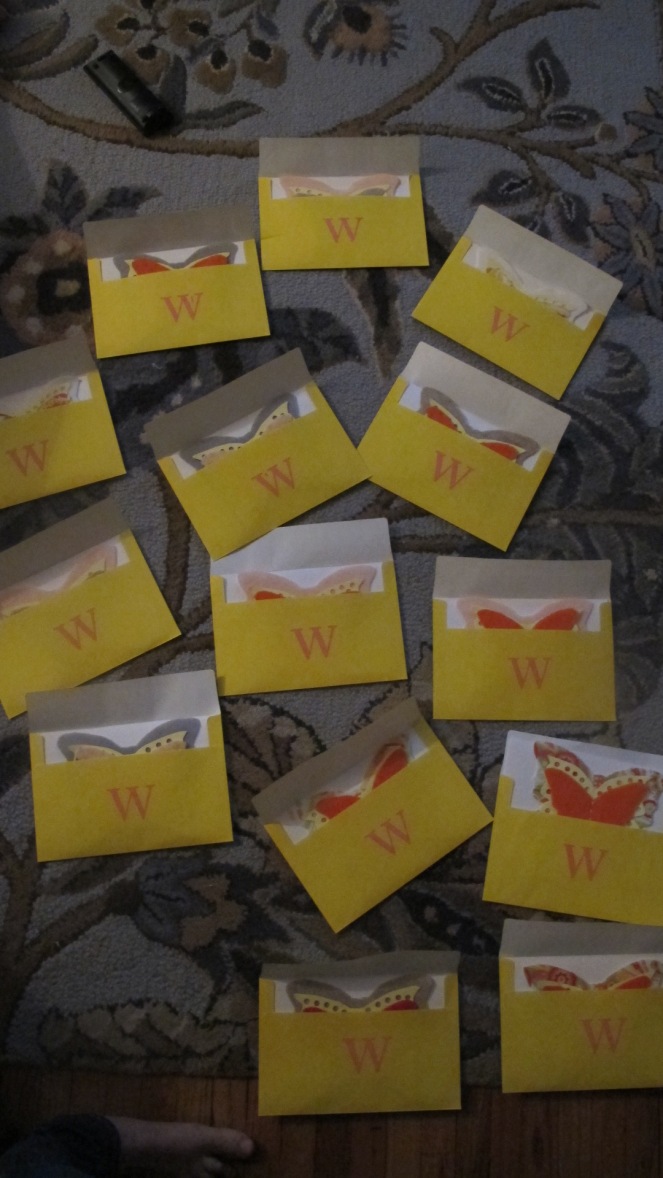
Step 3: Go around the edge and cut with your hole punch all the holes. Continue to cut-out as many as you need all in an assembly line. I used about 3 or 4 for each card.


Step 4: Look up a different butterfly shape and sketch it out. Enlarge your sketch to be a few inches larger than the other yellow paper butterfly. The shape should be different and there should be about an inch of space between the small and large butterfly. Make your template strong on card stock for cutting and tracing.
Step 5: Cut-out all paisley butterflies that you will need to complete your invites. Use just one for each.
Step 6: Cut-out another butterfly in a smaller size with again a different shape some what. So now you have a small, medium and large size. All with slightly different curves and looks. Cut this one in a orange felt smaller than the yellow paper butterfly with enough space between to make an obvious distinction between all butterflies. I used different color combinations for the invites. I actually was trying to reuse felt I’d had sitting around for along time. So, always try to reuse. I love to find new ways to make things work and to use up my stock. It also makes things more one-of-a-kind!
Step 7: Fold all of your 8×10 card stock paper in half. Press down firmly and run nail across when it lines up perfectly.
Step 8: Tape off 3/4″ or 1″ of a border on the inside of the bottom portion of the card. Make sure you are opening the card the right way and the tape is on the bottom border. Tape them all off.
Step 9: Paint them all pink. Don’t leave in the windy air. Keep them clean while working, nothing is touching and brush strokes are clean and covering the entire border.
Step 10: Let dry and pull tape slowly off. Once the border is dry take your candle wick and dab it into your gold acrylic paint. Make it lightly coated. Dot the bottom design across the border between pink line and white card.
Step 11: Now for the hardest part. Stamping your invitation stamp with all the text. Make sure your lined-up perfectly straight and your stamp is covered with ink. Wipe with a paper towel all the edges to make sure just text comes off. Stamp it and hold down. Practice on scrap papers until you get your technique down.
Step 12: Once the text stamp is dry, it’s time to use the dandelion stamps. Cover the stamp with enough ink and line-up real straight. Hold down on the left and right sides of the invite. Let it dry and hold top of card with a rock or wait.
Step 13: Look up a little bird online and sketch it out. Make a 1″ x 1″ little bird template. Cut-out the beige felt with it. I embellished a little eye with thread and made a little wing with the leftover paisley felt. You don’t need these details to make it look good, however.
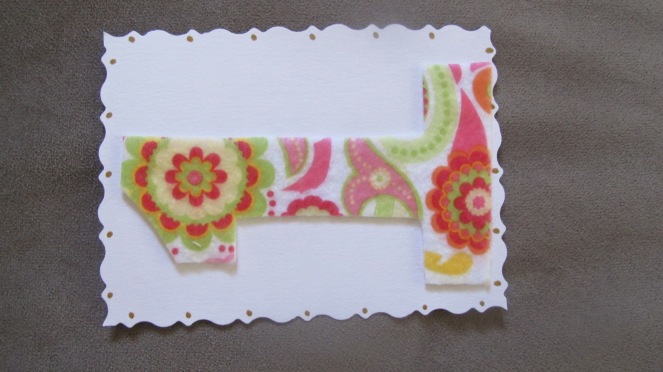
Step 14: Make the #1 card to place at the top of the card. I cut-out a rectangle that seemed to fit well in the upper portion of the card. I used the scallop scissor to cut-out the edges. Make sure you have good scallop scissors. Mine were terrible and took forever to get clean lines. This could save you hours. I used the gold paint and candle wick to dot it.
Step 15: Draw a number 1 really big to fill the inside of your scalloped card. I made a number 1 template with the card stock and cut-out all of them again at the same time. I hot glued them on the card and then to the actual large card. Be sure to sew your butterfly on first before you glue the #1 on. This way all rough edges and knots are covered up.
Step 16: Sew your butterflies to the front. Thread your needle with thick thread – x8. Sew a few stitches to secure the butterflies to the card. Tie it off nice and tight and double or triple knot it. Tape edges down. Then hot glue the number 1 card to the other side – covering it all up.
Step 17: Scallop edge your cover piece of paper. Cut all the way across so you can see a tiny border of pink at the bottom. This detail makes it extra nice. But be sure you are careful and use good scissors. If you mess it up, you can keep cutting a little higher and it will probably still look good!
Step 18: Put the final touches on it! Stamp your envelopes with pink Ws. WWWWWWWWWWW. It was so fun!
There is your fabulous 1st birthday butterfly card! This felt like Anthropologie in your hand. I used to be a Display Coordinator there, so I often relate to that store and it’s motto of “turning the ordinary into extraordinary”. The card was thick and substantial and homemade. The monogram really made it look fancy and the bright colors were really fun. Happy birthday card crafting!!!!

So cute and fun!!
LikeLiked by 1 person
Thank you, Johanna!!!
LikeLike